22 August 2012

Deborah Lippmann - Glitter In The Air

A few months ago now I posted about a Deborah Lippmann polish which I picked up as a little treat to myself (Stairway To Heavenm- HERE - to view). I mentioned in that post that I picked up a couple of Lippmann polishes, the other being Glitter In The Air! I struggled on which to pick from these two polishes so ended up with them both. They both stood out to me as they look beautiful in the bottle and both involve a bit of glitter! 

Glitter In The Air resembles a milky blue pastel shade, and like Stairway To Heaven, this polish contains bits of glitter. These pieces of glitter are in the colours pink and blue and range in sizes. The Lippmann site describes Glitter In The Air as a sheer "sky blue confetti" polish.


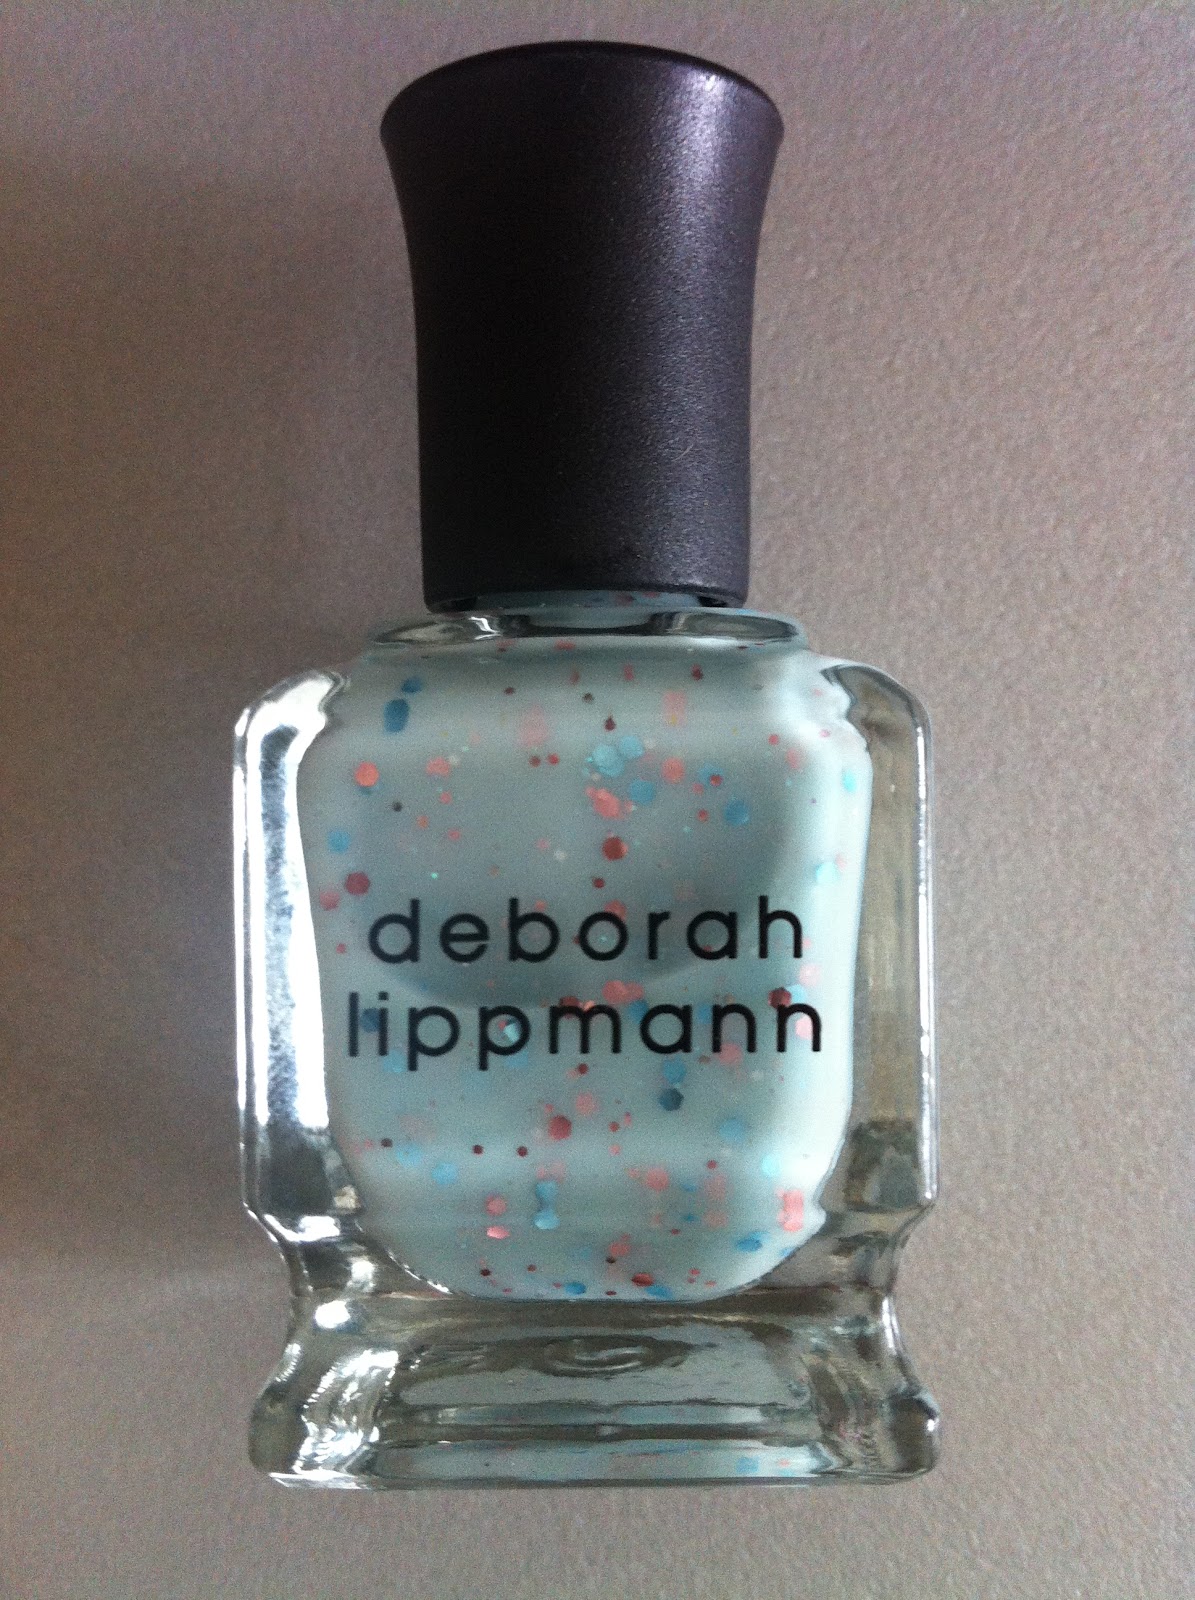
This polish applies nicely onto the nails so it's easy to achieve a lovely finish as the consistency of the polish is just right. It isn't runny or overly thick and I found the polish also dried fairly quickly which is always a bonus. The colour itself differs slightly from what you can see in the bottle. This polish is quite sheer so you don't quite get the blue shade that you see above, which is slightly disappointing. However with two coats you get a subtle milky pastel blue finish. Some people may not like the sheerness but I actually like the overall finish. I think it gives the nails a beautiful subtle shade and really compliments the bits of glitter. It's quite a unique, whimsical finish and is right up my street. This polish would look lovely layered over other shades, so achieving a bluer finish can be easy by just grabbing a blue polish and layering this over the top.

Similar to Stairway to Heaven there are also some very small pieces of iridescent glitter floating around, which I love as you can't spot them till you move your hand around. As this polish isn't the 'packed with glitter type' I'd definitely recommend two coats as with the first coat there are times where hardly any glitter is distributed onto the nail. Once the second coat has been applied you can achieve a nicer finish and have a more even cover of glitter. If you're looking for an opaque shade this isn't the polish for you. Although the shade wasn't quite as blue as I'd hoped I still really love the finish. In terms of longevity I've found that with two coats I had no chips or wear and tear for the best part of a week - quite impressive.

{One Coat}
{Two coats}
As you can see from the above swatches the finish is quite glossy particularly when in the light. I've included a swatch below away from direct sunlight - shows a more true to life finish I think.

At £16 a bottle these polishes aren't cheap, I justified picking a few polishes up as they were a bit of a treat and a brand that I'd always wanted to try. I hate falling in love with a shade and struggling to find similar more affordable versions so sometimes picking up the pricier ones are the only way. I have heard that Revlon's Whimsical is a great dupe for this polish but this isn't readily available in the UK - well not that I know of anyway. Although I would love to try it!


Overall I'm pleased with my purchases, Lippmann's polishes are definitely great quality and it always feels a treat when using them. There are a handful of really beautiful unique shades that are just too hard to ignore! I would also love to try Lets Go Crazy, Mermaids Dream and Ray Of Light (all glitter related shades- I really am obsessed). Lippmann does glitter like I've never seen before. 

Are you a Lippmann fan? Have you tried any Lippmann polishes?

20 August 2012

One Of Those Days...

Hello everyone. Today I'm going to post on some of the things I do when I'm having a pretty crappy day (and/or) week. Lets face it we all have one of those days every now and then, where everything seems a bit much and you end up feeling fed up or exhausted or just pretty low. The start of August was slightly stressful for me so I've had a few of these days recently. When I do have one of those days there are normally a few things that I do when I am feeling stressed/exhausted or fed up. 


{Image: My Own -Pixlromatic app for edits}

  • Run a hot bubble bath. This is definitely the first thing I do. Having a relaxing warm bath always makes me feel a little bit more relaxed, pampered and happier. It's also nice to just get into the bathroom, lock the door and have that little bit of time to yourself. Lush products normally make it that little bit better :)
  • If I've got home and I'm just feeling pretty rubbish or exhausted I normally just drop everything get into some comfy pyjamas and take it easy. Sometimes this isn't always possible, but when I can I will do this. There's been a few times where I've had bits to do but sometimes you have to accept that you're probably not going to get much done and you should allow yourself time to chill out even if it is just for a few hours or the night.
  • The comfy pyjamas goes hand in hand with climbing into bed or onto the sofa and just watching something that I know might cheer me up a little. Lighthearted TV such as 'How I Met Your Mother' (love this!), 'Family Guy' or good old 'F.R.I.E.N.D.S'. 
  • If I've retreated into my bedroom for the evening I will always light a few candles and my Yankee tart burner to add a lovely scent to my room. There's something quite peaceful about having the lights off/low and a few candles lit. Simple but effective. 
  • Music - I absolutely love my music. Sometimes playing a bit of music or just flicking through iTunes just helps distract me and lift my mood slightly. Musics great like that... something for every mood.
  • Browsing through blogs. I love reading through different blogs, some blogs can be quite uplifting and motivating. A lot of blogs can offer me a nice distraction which is always good.
  • Finally these things always help make things a little bit better; ice cream, cuddles with my beautiful pets, chocolate, family/friends/boyfriend, face mask, retail therapy, a good book.

So there you have it, of course most of the time these things don't fix my mood... sometimes there are just days were you can't shake it off, and that's absolutely fine. It's those types of days were you just have to accept how you're feeling and take it easy if you can. But the things I have mentioned definitely help me unwind that little bit more and can offer me a bit of a distraction from a dreary day.

16 August 2012

Revlon Just Bitten Kissable Balm Stain

Hello lovelies. Thought I'd share my thoughts on Revlon's new balm stains. I've seen quite a few posts on these floating around and quite liked the concept behind them so thought I would check them out myself. After having a mooch around the Revlon counter I ended up with the shade Honey. I picked this up over a month ago now so bit late on the post front.
Revlon's new balm stains look very similar to Clinique's Chubby Sticks - in other words the packaging is rocking the chubby crayon look. I quite like this as it's different to your standard lipstick/balm packaging. Although some may find this a bit too bulky. By twisting the bottom you are able to push up more product. Revlon's balm stains have a minty/dental floss scent to them, but I struggle to notice this scent once applied to my lips as the scent quickly fades. Due to the crayon tip of the balm stain this product is so easy to apply especially if you're on the go and want to apply some colour quickly. It can be quite low maintenance in that respect. I found this product to have great pigmentation which is easy to add to and build depending on the look you're going for.  

On application these balm stains offer a lot of colour and a slight glossy finish. It feels very soft and moisturising when applying, not like some lip products which can feel quite dry. The lovely thing about this product is the colour really does stay on your lips. Although the gloss fades the colour/stain sticks around for hours.
The shade I picked up - Honey - is a rosy pink/nude shade. In my opinion it leaves quite a natural dark pink finish when on the lips, so when the stain does fade it still looks lovely on. I'm not too sure what the other shades would look like on the lips after an hour or two. 

I'm really impressed with this product. I love the longevity and the colour pay off that you can achieve with these lip stains. I think they're affordable and great if you want a bit of colour but don't want to have to keep applying every ten minutes. I love how soft this feels  when applying on to the lips. But once on the lips, after a while I did find my lips felt quite dry, but as the stain stays on well I just popped a lip balm over the top which did the trick for me. Overall I think the colour pay off and longevity is brilliant for the price.

Have you tried Revlon's new kissable balm stains? Will you be trying these balm stains?

9 August 2012

Photo Diary

{Starting from top left - right}

-A gorgeous breakfast tray at a lovely hotel that me and the boyfriend stayed at to celebrate me passing my degree.
-I had to take a picture of these pretty lilies that are growing in my back garden.
-When it was hot! A walk, lunch and some ice cream by the river.
-Chocolate cake preparation. Yummy.
-My gorgeous ginger boy sleeping on my lap.
 -I received these yesterday as a little 'pick me up' from my boyfriend after having a bit of a rubbish week last week - such a thoughtful surprise, I love them.


I love seeing little collages like these that people put up on their blogs. I think it's a nice way to summarise what you have been doing, seeing, loving, wearing and so on. The list goes on.  I love taking pictures and being able to look over memories or creative/inspirational pics. Although sometimes I don't take enough pictures! 

Anyway here is my little collage for you all today. This includes a small handful of random (could say everyday) pictures taken from over the last couple of weeks. In future I'll add more, was just having a little play around on Picasa. I hope everyone is having a lovely week. Enjoy :)

2 August 2012

Back To Basics - Clinique

Hello everyone. Today I decided that I would do a post on my basic skin care routine. The reason for this is because it has served me well over the last few years and definitely deserves a little shout out. I will go into how I came across these products as I think it shows how the products have worked out for me.

I should probably start by saying that I have normal to dry combination skin. I'm quite lucky in that my skin isn't too sensitive and I don't suffer with many break outs. My skin can at times have a few little dry patches here and there, which is funnily enough how I stumbled across my skin care favourites in the first place.

It all started a few years ago when I had the most stubborn dry patch on my nose and to the sides of my nose by my cheeks, this was out of the ordinary for me and nothing was helping it to budge. The dry patch felt horrible and was even slightly flaky and a bit red. I tried applying different creams, I slathered on vaseline before going to bed, I changed my soap etc. Most of these things helped the dry patch disappear for probably about an hour before the it returned! So it really felt like nothing was healing or improving it. So as you do I had a little moan to one of my friends who recommended trying Clinique. 

I hadn't tried Clinique before so decided to have a little browse. I popped over to my local stockist and had a little consultation and chat with a lovely lady who recommended their 3 step skin care range. After looking at my dry patch I was asked if I use face wipes, which I did. I would use face wipes more or less every night to take my make up off. I was pretty naive at this point with my skin care knowledge, I didn't even think that face wipes could have been the cause but I was told they were drying out my skin. From that day on I have not used face wipes, I refuse to! I purchased the 3 step skin care range and haven't stopped using it since. I was so relieved and impressed that these products had helped to improve the condition of my skin and to budge the horrible dry patch. I really feel like I couldn't be without it. 

I must admit over the last few weeks I had been neglecting these products, I was getting a little caught up in trying different bits and bobs and as a result I had a break out and noticed a difference in my skin. Pretty much straight away I went back to basics and just stuck to using my 3 step skin care products. After a week or two my skin went back to normal. I know I can rely on these products and thought I'd share a bit of my love for them with you all. 

Clinique has a few ranges to suit all different skin types. When having a consultation you are able to identify what type of skin you have and pick up the products that are most suitable for your skin type. 

{L-R - Step 1, 2 & 3. Apologies for the picture quality not being the best}

STEP 1: Liquid Facial Soap (Mild) - 

This facial soap is non drying and fragrance free. The pump applicator makes this product easy to use and not much is needed to get a nice foam going when working into the skin - so you don't quickly run out of this. This product is very gentle and is intended to cleanse the face. I usually wash my face as normal then use one pump of this in the morning and one in the evening, so you really don't need much. A little bit goes a long way as it lathers up to a bit of a foam. My skin always feels refreshed, clean and soft after using this.

STEP 2: Clarifying Lotion -

The clarifying lotion is described as a gentle exfoliating lotion. It is fragrance free and is the same sort of consistency as water. This is used on skin through dabbing a bit onto a cotton ball or pad and then sweeping lightly over the face and throat. Again, a very little goes a long way as only a small amount needs to be swept onto the face. Like the facial soap it can be used twice a day. I find this lotion quite gentle although sometimes I can feel a slight tingle when applying, but this doesn't feel uncomfortable or irritating in any way, I actually find it quite refreshing. I feel that this is a necessary step and love applying my moisturiser after using this.

STEP 3: Dramaticallty Different Moisturising Lotion -

The final step is a very gentle moisturiser. Like the other products this is fragrance free. I find this just the right consistency, it feels lovely to apply and I can really feel my skin soaking it up. It isn't always necessary to put this on all over the face, a little bit can be used were needed (such as dry patches or problem areas) or it can be used all over the face and the throat, depending on what you want or need. I personally like to apply this all over as I feel it's nice and moisturising, especially before bed.

The nice thing about Cliniques products is that you have the option of purchasing different sizes, as well as containers with or without the pump. This is great as you can have a bit more choice as to what you prefer. I personally find the pumps a lot easier. I also like how Clinique tries to accommodate for different skin types (dry, normal or oily). 

I can't comment on how effective it is for other skin types but it's worked wonders on my normal-dry combination skin. It goes without saying that everyone is different and everyone's skin is different so these products may not work for everyone. But for me, personally, I love these products and can't see myself not using them, I've continued to repurchase them after using them up, and nothing really has quite produced the same results. I think I'll always have a soft spot for them as they helped me when my skin needed it.

If you want to know more about Clinique and their 3 Step range then click HERE. Clinique's products can be purchased online and in some stores such as Boots, John Lewis, Debenhams, House of Fraser and so on.

Have you tried Clinique's products before? What are your skin care basics that you couldn't live without?

20 July 2012

A Little Bit Of Inspiration

I've been having one of those semi-productive days today. I had such good intentions this morning, I even had a to do list! It's been my first full day off in a while and like many other people I have quite a few bits and bobs that I should really be getting on with. But I think I'll let myself off the hook today as I did manage to do at least half of the things that were on my list :) But I quickly got distracted by my laptop...typical.

I thought I'd have a little ramble about one of my favourite sites...Pinterest (the thing that has been distracting me all afternoon!). It's a fairly popular one I'm sure. It's basically a virtual pinboard, so through Pinterest you're able to share and organise pictures of pretty much anything! The reason I'm sharing this with you all is because I find it such a motivator. It really has become like a little scrap book of pictures that I find pretty, inspiring or just of things I like or would like to do/try, of places I'd like to go and the list just goes on. Categories on Pinterest can range from food, travel, weddings, home, beauty, sport and so on. 

I'm quite an arty person. I love creating things and I'm into home decor and all things creative! Pinterest is brilliant for giving me ideas on different things to try, on little D.I.Y projects as well as home decor. I also love how through some of these pictures you're able to access many of the original sources. Through Pinterest I have stumbled across some really great blogs and sites. All in all whenever I'm lacking a bit of Ooomph, Pinterest is one of my places to go! I also love going through pictures of quotes, cute animals, yummy food-recipes, beautiful travel locations, beauty and home decor. 

Well that is my ramble for today! I just thought I'd share. I know there is a handful of sites like Pinterest but for those who maybe haven't had a browse yet I'd recommend it. There is definitely something on there for everyone and it really is a lovely way to pick up some ideas and inspiration. I thought I'd attach a few of my random, favourite pictures/pins so far. I've tried to include a bit of everything. Although each of these are from Pinterest, where I can I have attached the original source. None of these images are my own. Enjoy :)

{Got to love a bit of glitter}
{I absolutely love fairy lights in the bedroom!}
{Original Source: The Beauty Department.  I love this site!! Check it out if you haven't already}
{This is so pretty... and actually quite easy to make. Original source: Sania Pell Disco Vase. Discovered Sania Pell through Pinterest, I absolutely love some of her home decor ideas!}   
{How stunning and peaceful does this look? Fairy Pools-Scotland. Original Source: Google Images}

(Just thought I should mention that I'm not sponsored or affiliated with Pinterest in any way - just thought I'd share my love for this site)

Are you a fan of Pinterest? Where do you get your inspiration/motivation from?

17 July 2012

Essie Bargain

Hello Everyone.

I had to share my little Essie find with you all. While browsing through my local Tk Maxx, last week, I spotted a few packs of 3 Essie nail polishes for... £9.99! I couldn't believe my luck - what a bargain! After picking up Essie's Eternal Optimist (blog post - HERE) a few months back, I quickly fell in love with the brand. So it probably comes as no surprise that I didn't waste time in grabbing this bargain. I don't regularly go into Tk Maxx so I'm not sure how long this deal has been going on for, but I'm guessing it's a new thing as they definitely weren't there the last time I visited the store. There isn't a huge variety of packs of 3's, but there are a a few different shades to choose from. 

Individually these polishes can retail at around £7.99. So for 3 normal sized bottles for £9.99 I'd say that is pretty good going. My pack of 3 included the shades Jag-U-Are, Tea & Crumpets and Capri. I have spotted that Tx Maxx have made a little mistake with labelling these nail polishes, well one in particular anyway! When looking at the Essie website I noticed that Tea & Crumpets isn't actually the polish that was in this set (the real Tea & Crumpets polish is actually more of a shimmery gold colour) there must have been a mistake with the labelling! So unfortunately I can't tell you what the actual name of this Essie polish is - or what it should be. But for the purpose of this post I will refer to it as Tea & Crumpets - even though this is actually incorrect! Very annoying.

Moving on... I love the look of all of these Essie shades, so this was the pack of 3 I choose to go for. 
{L-R - Jag-U-Are, Capri and Tea & Crumpets (isn't correctly labelled)}
In terms of application Jag-U-Are is quite thick so just one coat gave me a lovely opaque finish. I'd describe Jag-U-Are as a cherry red (it looks slightly darker in some of the pictures) with a slight almost gold shimmer to it. I think this shade would look lovely on the toes. Capri is a gorgeous french manicure shade pink, it's very pretty and natural. It's definitely a barely there shade. Tea & Crumpets (which actually ISN'T Tea & Crumpets - confusing I know) is also quite a neutral shade it's a very pale pink/almost white shade which I love. I've compared this to Ballet Slippers and although they're fairly similar in shades Ballet Slippers is slightly paler and less pink in comparison. I have to say I think I'm becoming slightly obsessed with Essie! These polishes apply lovely, they give a nice finish and I love the quirky names. Definitely impressed with this bargain, despite the little labelling mistake. 
{L-R - Tea & Crumpets (again this isn't the correct name of this polish), Capri and Jag-U-Are. Two coats}

I have to say the above image didn't really capture the slight shimmer that comes with Jag-U-Are. But there is a slight shimmer there. I think its a nice alternative to the  standard red. 

So if you're an Essie fan and anyway near a Tk Maxx I'd suggest popping in and having a little browse :)

Related Posts Plugin for WordPress, Blogger...